Avaya H.323 handset registration through a firewall

I have been looking a lot recently at Avaya H.323 handsets and how they register with Avaya session manager servers. I had hoped at the start of the project that there would be some good quality documentation available to detail the process and specifically how to get it to work through a firewall. The environment I am working with requires a firewall border between the security zone that hosts the handsets and the security zone that hosts the session manager and media servers so it was very important that we could understand the registration process. Unfortunately the Avaya documentation we were able to obtain is vague and fairly contradictory in parts and the Avaya consultancy just provided a list of ports that they expected to be open ‘bi-directionally’ from all IPs to all other IPs; an approach that the InfoSec team were not keen to entertain.
After a bit of investigation I’ve managed to nail down a fairly comprehensive understanding of the registration process and the flows necessary for phone registration to work.
DHCP
Initially when the phone boots it needs IP configuration; normally this is done through DHCP. If you are manually configuring IP addresses on handset then you are probably a masochist or working in a small lab so you can skip onward to the next section. Getting DHCP to work through a firewall is probably worth another post because it relies on UDP helpers to turn a broadcast into a unicast but I’ll do my best to keep it concise.
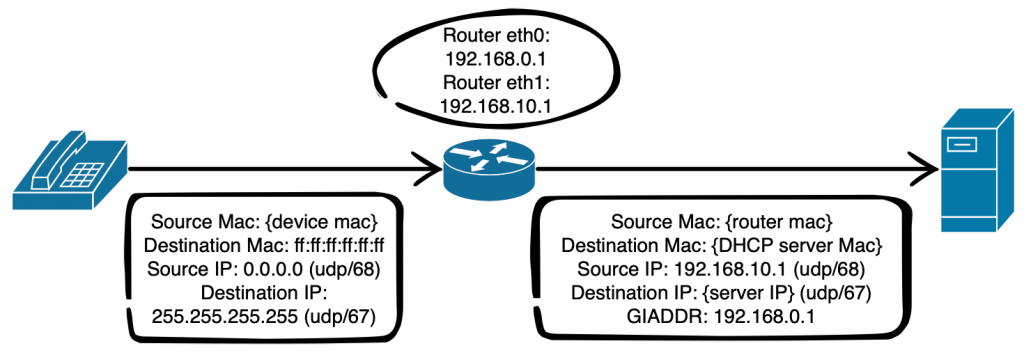
If you’re going through a firewall it’s probably safe to assume that you have a layer 3 hop between your handset and the DHCP server – you might have the DHCP server locally on the same network so you can ignore this but you are probably using DHCP helper addresses. Remember that at this stage the handset does not have an IP so it uses a broadcast frame to FF:FF:FF:FF:FF:FF which would be received by every device on that LAN segment including any DHCP servers if they are present. If there is no DHCP server and DHCP helpers have been configured the router or device configured with the helper addresses turn the broadcast frame into a unicast packet with the destination address of the configured DHCP server and the source address of the router configured with the helper. The relay agent also adds the address of the interface it received the discover frame into the GIADDR field.

The DHCP server receives the unicast packet and uses the GIADDR field to determine which scope to provide the IP address from and sends an offer packet back to the relay agent. The relay agent forwards the frame with the phone’s Mac as its destination.

The process is repeated again with there request and the acknowledgement using the same ports. If we assume that the firewall sits somewhere between the router and the DHCP server in the above diagram then the firewall rules required for DHCP would be thus:
| Source | Source Port | Destination | Destination Port |
| Router | udp/68 | DHCP Server | udp/67 |
| DHCP Server | udp/67 | Router | udp/68 |
It is quite common at this point for DHCP options 242 or 176 to instruct the phone to switch to a dedicated VLAN, it then repeats the process to get DHCP information but from a different VLAN.
Configuration and Firmware File Server
One of the configuration items available in DHCP Options 242 or 176 is a file server which can be accessed using http or https to download firmware files and other configuration information. The port is configurable however the well known ports of tcp/80 for http and tcp/443 for https are most commonly used.
| Source | Source Port | Destination | Destination Port |
| Phone Handset | tcp >1024 | File Server | tcp/80 or tcp/443 |
H.323 Discovery
If you are using h.323 Discovery the phone can send a multicast packet using udp/1718 to discover a gatekeeper. It’s more likely though that your session manager is configured using DHCP option 242 or 176 in which case the handset will send a registration packet using udp/1719 to the session manager.
Registration Request
The gatekeeper and registration requests are sent from the phone to the configured session manager on udp/1719 with the source port of udp/49300. Replies are sent with the ports reverse however it’s fairly possible that your firewall will allow this return path.
| Source | Source Port | Destination | Destination Port | Note |
| Handset | udp/49300 | Session Manager | udp/1719 | gatekeeperRequest |
| Session Manager | udp/1719 | Handset | udp/49300 | gatekeeperConfirm |
| Handset | udp/49300 | Session Manager | udp/1719 | registrationRequest |
| Session Manager | udp/1719 | Handset | udp/49300 | registrationConfirm |
Registration
The final part of the registration is to establish the call control channel. This is initiated by the session manager to the handset using tcp/1720 as the destination. There is a configurable range of source ports which default to 61440- 61444. Additionally the handsets send ICMP ping requests every 15 minutes to the session manager and the session manager sends ping replies back.
| Source | Source Port | Destination | Destination Port |
| Session Manager | tcp/61440- 61444 | Handset | tcp/1720 |
| Source | Destination | Type |
| Handset | Session Manager | echo-request |
| Session Manager | Handset | echo-reply |
Onwards to Media
Now that the handset is registered it should be functional. There are some additional ports which cover monitoring and encryption which will be covered in a followup and then there is the matter of opening the mostly configurable ranges of UDP ports for RTP media which will also follow in a subsequent post.