Getting your underpants inside out over NAT
A colleague asked me to write a post on NAT and so this one is for him. I’m going to use a very basic three router lab to go through the common types of NAT and where they are used.
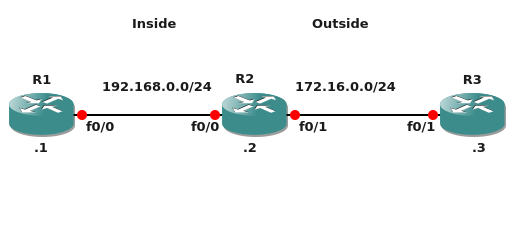
First off there is the convention of inside and outside interfaces. The golden rule here is how the router tries translation and then routing or vice versa. Packets on the NAT outside are first translated and then routed. On the inside interface routing decision kicks in first and only then translation rules get applied followed by forwarding. In reality you can pretty much achieve the same things regardless of which way round the interfaces are but generally it makes it a lot harder if you don’t keep the inside pointed to the core of your network and outside pointed to third party networks and the internet.
There are lots of reasons to use NAT and it has both delayed the necessity of adopting IPv6 and helped get around many of the kludges that RFC 1918 address space introduced to the internet. Hopefully you should understand where NAT is a necessity on your network and know to use it sparingly as it doesn’t scale all that well.
So here’s the initial lab setup in case you want to put it together.
R1
interface FastEthernet0/0
ip address 192.168.0.1 255.255.255.0
R2
interface FastEthernet0/0
 ip address 192.168.0.2 255.255.255.0
 ip nat inside
!
interface FastEthernet0/1
 ip address 172.16.0.2 255.255.255.0
 ip nat outside
R3
interface FastEthernet0/1
 ip address 172.16.0.3 255.255.255.0
The first scenario is the connection to the internet using a single public IP. We’ll pretend that the 172.16.0.0 address space is public address space for the purpose of this demonstration. The goal is to take traffic sourced from the inside and translate the source address to the outside interface address on Fa0/1. Return traffic correspondingly will have the destination address changes as it passes from outside to inside. We also want to overload the outside source address so that it can be shared by multiple inside sources.
First job is to tell R1 where the outside world is using a static route. At home your computer has a default gateway that points to the inside of your DSL router and this is just doing the same job.
R1
ip route 172.16.0.0 255.255.255.0 192.168.0.2
Next we configure the translation on R2
access-list 6 permit 192.168.0.0 0.0.0.255
ip nat inside source list 6 interface FastEthernet0/1 overload
The ACL specifies the range of source addresses we’re going to use and then the ip nat command says we’re going inside to outside translating the source addresses from the ACL list to the interface address. We’re also specifying overload as many inside addresses will share the outside address.
Packets coming from R1 with R3 as the destination get to R2 and the source address is changed to that of Fa0/1 on R2. A table entry in R2 allows returning traffic to have the destination address of R2 changed to the correct inside address, in this case R1. This sort of NAT overloading is often called Port Address Translation.
One of the most useful commands for troubleshooting NAT is sh ip nat translations which, predictably, shows you the translation table.
R2#sh ip nat translations
Pro   Inside global Inside local  Outside local Outside global
icmp  172.16.0.2:5  192.168.0.1:5 172.16.0.3:5  172.16.0.3:5
The terms here rely on your earlier choices for which is the inside and which is the outside of the network. The addresses are the source and destination across the NAT with inside showing what is on the inside and outside showing what is on the outside. The local and global are local for what we see the address as and global for what the rest of the world sees the address as. You can see that the inside (source) address has been changed as it passes from local to global however the destination remains the same. This view gives you an instant insight into what sort of NAT is happening.
The biggest drawback for PAT is that each connection needs to have a table entry and there is a hard limit of 65535 connections as each connection requires a unique source port on R2. It’s really easy to reach that limit even in a relatively small network, especially if using could applications such as SFDC or Office 365 as each user will make multiple outbound connections.
The next lab is to remove the PAT and replace it with a dynamic NAT based on a pool of source addresses.
We’ll leave the ACL but remove the NAT
no ip nat inside source list 6 interface FastEthernet0/1 overload
Then we’ll define a NAT pool of addresses and use that for the outside.
ip nat pool NAT_POOL 172.16.0.50 172.16.0.100 netmask 255.255.255.0
ip nat inside source list 6 pool NAT_POOL overload
This does pretty much the same thing as the earlier PAT however it uses a range of addresses which gives you a greater number of possible connections.
A quick look at the translations after a ping from R1 to R3 confirms the change to the translation.
R2#sh ip nat translation
Pro  Inside global  Inside local   Outside local Outside global
icmp 172.16.0.50:11 192.168.0.1:11 172.16.0.3:11 172.16.0.3:11
R2#
For various regulatory reasons it might be necessary or desirable to be able to easily trace back through the NAT to a source address, for example to trace connections to an application back to the client. The simplest way to track back is to define a pool with type match-host as that maintains the host portion of the address and translates the network portion. In a /24 network this means the last octet will remain the same.
After removing the earlier config define a larger NAT pool to match the inside address range then apply the same NAT rule without the overload.
ip nat pool NAT_POOL 172.16.0.1 172.16.0.254 netmask 255.255.255.0 type match-host
ip nat inside source list 6 pool NAT_POOL
There is a subtle difference when looking at the translations. As the translation is one to one there is no entry in the outside address. If you were connecting to an application the source address seen by the application would be 172.16.0.1 which you can trace back to 192.168.0.1
R2#sh ip nat trans
Pro Inside global Inside local Outside local Outside global
--- 172.16.0.1    192.168.0.1  ---           ---
R2#
Finally we’ll finish on the simplest type of source NAT, a static NAT to translate the inside address.
After you’ve removed the earlier NAT config you can issue this command. The first address is the inside local address and the second address is the inside global address.
ip nat inside source static 192.168.0.1 172.16.0.99
Again if we look at the translations you see the connection as a one to one mapping.
R2#sh ip nat trans
Pro Inside global Inside local Outside local Outside global
--- 172.16.0.99 192.168.0.1 --- ---
R2#
Now we’re going to translate the destination going from the inside to the outside. In this translation the outside global address is the address that the world sees, the untranslated address. The outside local address is the address we see locally which in this case is translated.
ip nat outside source static 172.16.0.3 192.168.0.55
Now a packet coming from 192.168.0.1 to 192.168.0.55 reaches R2 and has both the source and destination address changed. The ongoing packet has source of 172.16.0.99 and destination of 172.16.0.3
Return packets from 172.16.0.3 to 172.16.0.99 hit R2 and the source changes to 192.168.0.55 and the destination changes to 192.168.0.1
R2#sh ip nat trans
Pro Inside global Inside local Outside local Outside global
--- --- --- 192.168.0.55 172.16.0.3
--- 172.16.0.99 192.168.0.1 --- ---
R2#
Summary
| Command | Action |
|---|---|
| ip nat outside source static |
|
| ip nat inside source static |
|